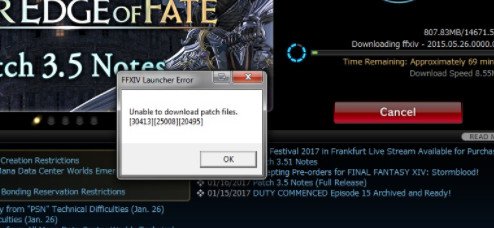
It’s very irritating when you receive “Unable to download patch files” error while downloading the updates or installing the Final Fantasy 14. This mistake obviously interrupts the download process and not all game patch files can be downloaded. You start thinking about what’s wrong with my PC.
There are some things which cause this issue. Ffxiv’s firewall configuration may be a reason for not downloading the patch files, i.e. your system cannot download these patch files anymore, or other reason for not downloading or routing patches might be.
So below are some methods to solve this issue. You can try each method until your problem is resolved.
Solution 1: Use VPN
Your network may often restrict patch file download and therefore your system will show that the patch files cannot be downloaded. One way to resolve this issue is by changing the way these patch files are downloaded and it can easily be achieved with a VPN.
Just download and install the VPN application. Run the VPN and begin downloading. A free version or test is available in most VPNs. Therefore, you don’t have to worry about the payment too.
Due to the way that VPNs work, the download procedure is slowed down with VPN although the internet is good. You can switch back to normal internet after downloading the patch file.
Solution 2: Change Your Firewall Settings
Patch-File-Error is one of the reasons why ffxiv can’t download. The firewall may not allow the system to download the patch files, and your system, therefore, shows an error. So follow the below steps to turn off the firewall:
- Press “Window+R” keys
- Type firewall.cpl and hit Enter
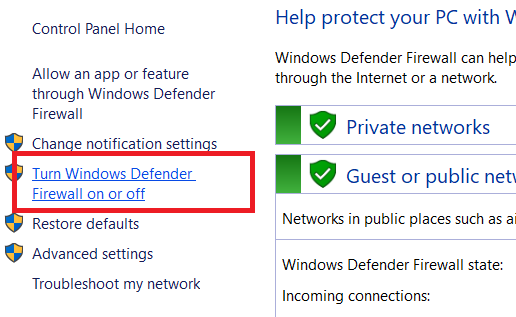
- Choose the Windows Firewall Turn off option (not recommended). In both, Public Network Settings and Private Network Settings.
- Click Ok
If you’ve done, turn off the firewall with the above-mentioned steps.
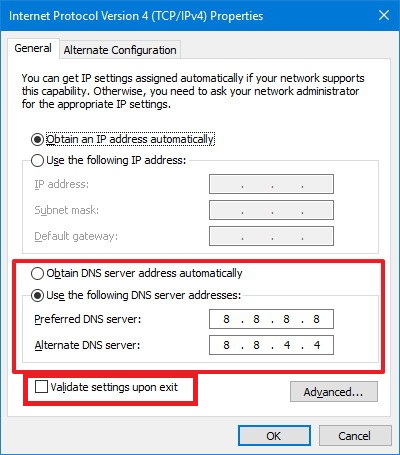
Solution 3: Change The DNS Server
Some users solve this issue by changing the DNS server. The problem will be solved by switching DNS servers to Level3 DNS servers or Google DNS servers.
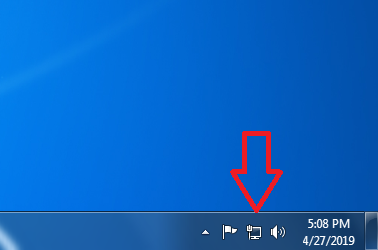
- Right Click on the computer icon and click on “open network and sharing center” (Bottom right side of your PC’s monitor)
- Then click “Change the settings of the adapter“.
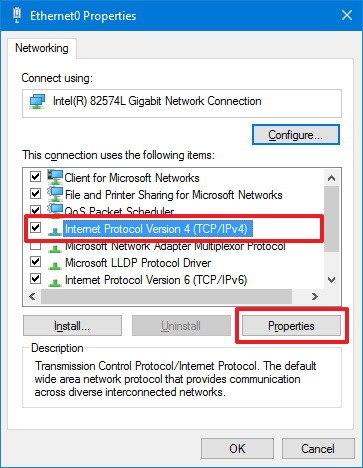
- Right-click and go to the properties on your network connection.
- Choose Internet Protocol Version 4 (TCP / IPv4) under the available options and click Properties.
- Click the option Use the following DNS server addresses:
- Type 8.8.8.8 in the Preferred DNS server
- Type 8.8.4.4 in the Alternate DNS server
- Check the validation option for settings after exit
- Now Open command prompt (CMD)
- Type ipconfig /flushdns and press Enter
- Type ipconfig /release and press Enter
- Type ipconfig /renew and press Enter
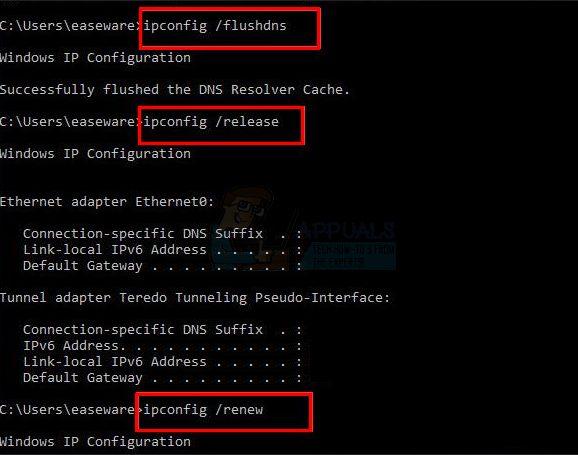
- Then Close the command prompt.
Once you’ve done, Re-start your computer and try downloading the patch files again.
I hope your problem is fixed.


![[SOLVED]: Javascript:void(0) Error](https://wpbloggerbasic.com/wp-content/uploads/2019/04/How-to-fix-the-JavaScript-error_-void-0-in-browser.png)

My relatives all the time say that I am killing my time here at net, except
I know I am getting know-how daily by reading thes fastidious posts.