Are you looking to show the GeneratePress top notification bar without any plugin in your GeneratePress WordPress theme?
If yes, then you landed on the right web page.
GeneratePress themes come with tons of customization options and creating a notification bar is also one of them. There are some GeneratePress theme examples that are doing well in search engines.
You can create a notification bar with the help of some codes & javascript without using any plugin. In this tutorial, we will learn:
- Use elements module of GeneretaPress theme.
- Create a notification bar sticky.
- Create a mobile or tablet-friendly notification bar.
- Style notification bar using CSS.
- Use javascript to close the notification bar.
- And so on.
Before going forward, make sure you have a GeneratePress premium theme. If you don’t have a GP premium theme, you can read our GeneratePress review to purchase one.
So, without further delay let’s start.
What is a Notification Bar in a WordPress Theme?
When you open a website and a notification bar show you before the header on the top of the website it’s called a notification bar. Here is the best example:

These features are mostly used by business websites that want to promote their products, services, or sales.
Here are the benefits of creating a top notification bar in your WordPress theme:
- Helps you to drive more sales on specific pages.
- Helps you to get more affiliate sales.
- Can be used to promote products.
- Grow your email list by offering a newsletter subscription.
- Display a promo code.
- And so on.
As you can see there are lots of benefits to showing a notification bar in a WordPress theme. I also create a video tutorial on How to show the Generatepress top notification bar without a plugin.
You can also watch this detailed tutorial (Hindi).
How To Show GeneratePress Top Notification Bar?
In order to show the notification bar in the GeneratePress theme, you need to off the sticky navigation if you are using the sticky menu in the primary menu.
To off this sticky navigation you need to go to the Appearance > Customize > Layout > Sticky Navigation > Off
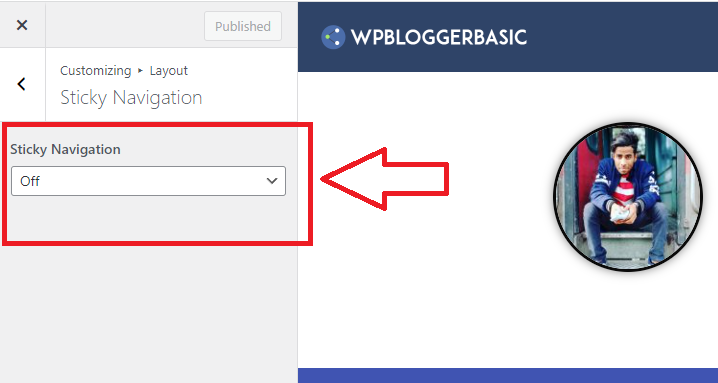
After doing this follow these steps.
Step 1: Enable Elements Module
The first thing you need to do is to enable the elements module. It is a feature of the GeneratePress premium theme.
If you don’t have a GP pro theme, you can’t customize anything in the GenaratePress theme if you don’t have any coding knowledge.
So, here is how you can enable the elements module in the GeneratePress theme if you haven’t enabled it.
Go To Appearance > Generatepress > Modules and activate the elements module.
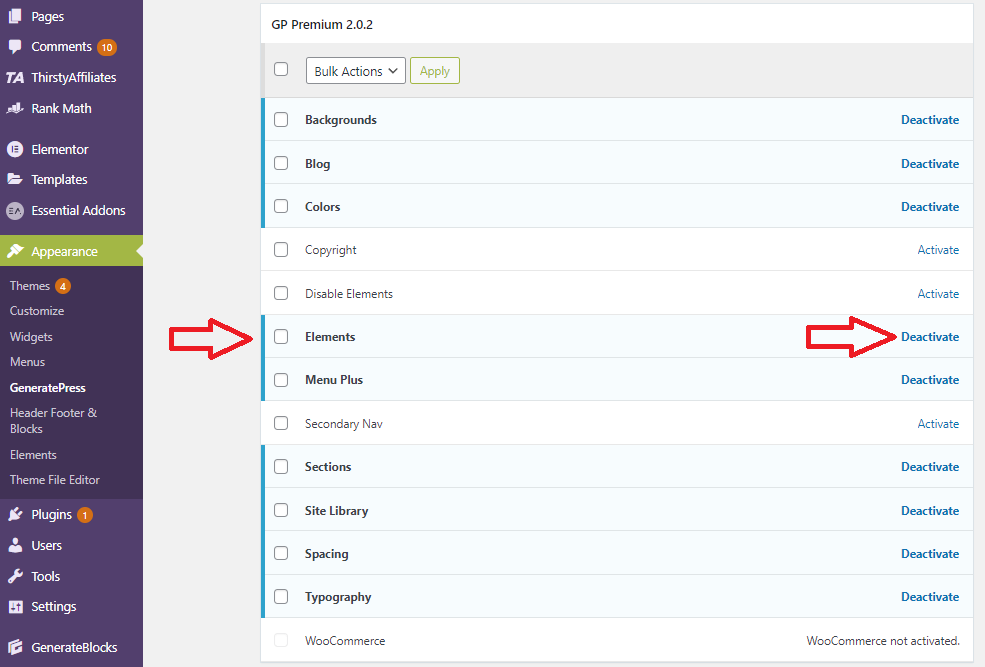
Step 2: Create New Hook Elements
Now go to the Appearance > Elements and click on ‘add new elements’ as a hook.

Here is the code, copy & paste the code into your hook elements.
<div id="wpbloggerbasic-top-bar-notification">
	<div class="notice-inner grid-container">INSERT YOUR NOTIFICATION HERE!  <a href="ENTER YOUR URL HERE" target="_blank">INSERT YOUR LINK TEXT HERE</a><button id="wpbloggerbasic-closebar" type="button">X</button>
	</div>
</div>
Scroll down and go to the hook settings and choose the hook as ‘generate_before_header’. Don’t change and tick anything after doing this.
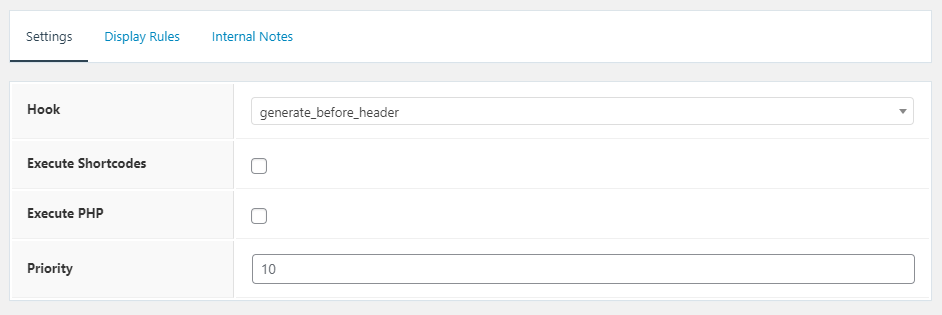
Now, go to the display rules and choose the location as ‘Entire site’.

After doing this hit the publish button.
Now, you need to create one more hook element to paste on our javascript. We need this javascript to close or dismiss the notification bar as we are not using dependencies.
We are using pure javascript which doesn’t slow your website speed.
<script>
    document.getElementById("wpbloggerbasic-closebar").onclick = function() {
        var z = document.getElementById("wpbloggerbasic-top-bar-notification");
        if (z.style.display == 'none') {
            z.style.display = 'block';
        } else {
            z.style.display = 'none';
        }
    }
</script>
You need to copy the above code and create a new hook element by following the same above method.
After creating it name the hook title and paste the above code into the hook box.
Scroll down and select wp_footer in the hook settings.
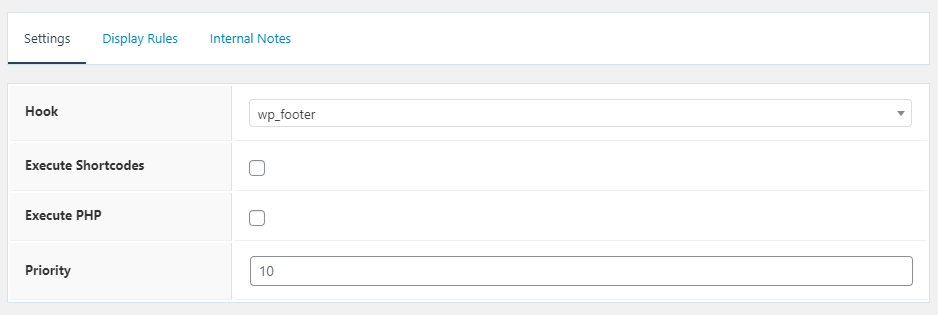
Now, go to the display rules and choose the location as ‘entire site‘.
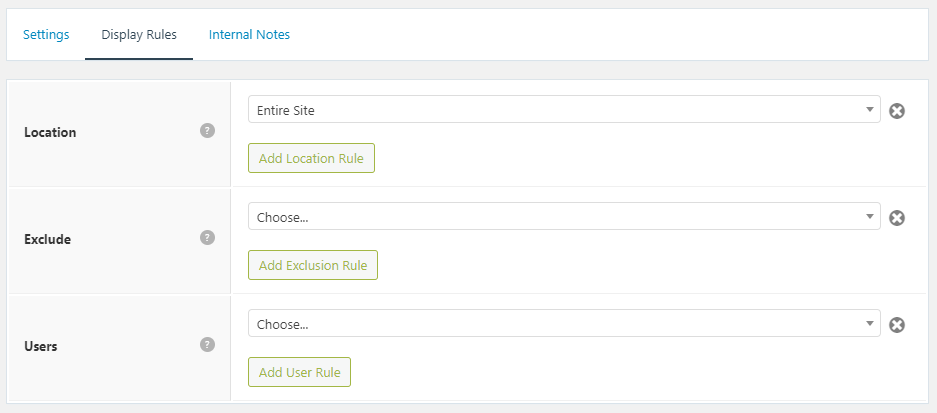
Hit the publish button.
Step 3: Style Notification Bar
If you look at the notification bar then it looks so bad. You need some additional CSS to style the notification bar.
Go to the Appearance > Customize > Additional CSS.
Now copy the below code and paste it to the end of the additional CSS.
#wpbloggerbasic-top-bar-notification {
    text-align: center;
    position: -webkit-sticky;
    position: sticky;
    top: 0px;
    z-index: 9999;
    border-bottom: 3px dashed #eaf1f8;
    background-image: linear-gradient(to left, #E100FF, #7F00FF)!important;
    color: #fff;
    font-size: 15px;
    padding: 7px 0px;
}

.admin-bar #wpbloggerbasic-top-bar-notification {
    top: 32px;
}

#wpbloggerbasic-top-bar-notification a {
    border-bottom: 2px dotted;
    color: #fff;
}

#wpbloggerbasic-closebar {
    float: right;
    padding: 5px 9px;
    border-radius: 15px;
    background-color: #eee;
    color: #34495e;
    line-height: 1em;
}
Here is what your results look like.

As you can see the result looks so attractive and unique. In this way, you can show the beautifully looked notification bar in the GeneratePress theme.
Also Read:- GeneratePress Free vs Premium | Detailed Comparison
Conclusion
No doubt, GeneratePress is fast loading, user-friendly, and fully customizable WordPress theme in the market. You can create a website in any niche using the GeneratePress theme.
Using this tutorial you can attract more visitors, grow your email list, and can get more affiliate sales.
If you have not purchased the GeneratePress premium theme yet then you can purchase using this link. Here is my tutorial on GeneratePress pricing to learn more about the pricing structure of GP premium.
You can also watch the Youtube video I mentioned above where I clearly do all the above steps.
After applying all these methods, if you are getting any issues or errors you can contact me in the comments box. I will reach you as soon as possible.

![How To Sign Up With Bluehost Hosting in 2024 [+70% Discount] 11 Bluehost sign up](https://wpbloggerbasic.com/wp-content/uploads/2022/07/Bluehost-sign-up-1-768x432.png)

![ShortlyAI Free Trial 2025: Get Your Free ShortlyAI Account [No Credit Card Required] 13 shortlyai free trial](https://wpbloggerbasic.com/wp-content/uploads/2022/02/shortlyai-free-trial-768x432.png)

![[Solved] " WordPress Connection lost. Saving has been Disabled Until You’re Reconnected" 15 Wordpress Connection Lost](https://wpbloggerbasic.com/wp-content/uploads/2019/02/Wordpress-Connection-Lost.png)
Thank you Very much bro